POSTS
Creating a Flutter Plugin
Creating a Flutter Plugin. The journey of a web developer
Flutter is a really nice piece of technology. It seems easy to use and with the new features that were announced with the new flutter version namely collection if and collection for, which allow a more concise syntax for working with lists it seems quite fun to use.
So flutter is easy peasy. Write the widgets, test them if needed and move forward.
But what if we want something that doesn’t exists?
This is a question which everybody surely thought when starting out with flutter.
To answer this questions we need to know a few things in advance.
- Do we want to have a separate modular package?
- Do we need to access native functionality?
This questions are important to evaluate in the beginning, because it affects the way our solution will be used.
Our Case Study - Background
First things, first (or second in this case^^)…
A long step-by-step guide for writing a flutter plugin is boring and has been done often enough. So we want to learn something with a concrete case I had recently. I needed a way to find the bounding box or the contour of a rectangle in an image for further processing.
The good thing is there is an awesome computer vision library out there called OpenCV.
The only problem is that this library is written in optimized C++ which cannot be accessed directly from Dart (Eventually there is an open issue for this, but it cannot be accessed directly for now).
Writing the full code of gray scaling, thresholding and manipulating an image in dart and the whole logic around finding the features we need is cumbersome and a very complex problem.
Basic knowledge of package types
According to the flutter documentation there are two types which have different usages:
- Dart packages
- Written in Dart
- Maybe have a dependency to flutter
- Plugin packages
- specialized Dart package
- Combine native implementation for Android and IOs
A few examples for either one of the package types is the path package which is a dart package and is completely written in Dart.
On the other hand we have the battery plugin which needs to access native APIs of the different platforms to gather the needed data.
Our Case Study – Requirements
With the background set, our new knowledge about the package types we can use, we know one thing: We want a Plugin
But what are the specific requirements we need to fulfill?
- Find the contour of a rectangular object in an image (It must have 4 edges, because I needed it like this ^^)
- We want to use OpenCV because it is much easier than writing everything ourselves
- Maybe add some helper methods when needed.
Why a plugin here?
I want this to be really clear to you, so we go through the thought process again:
- We want to use OpenCV because we want that functionality.
- OpenCV is written in C++
- It releases packages for Android and IOS
- Flutter can access native code through plugins and so called MessageChannels (more of them later)
- We want our plugin to be reusable by others
- This has a few reasons:
- I’m not the best Objective C Developer and also my Java is not the best (you read above I’m a Full Stack Web developer), so maybe someone finds a mistake in my code which I wouldn’t find myself
- There was nothing like this and I wanted to try this out
- This has a few reasons:
With this in mind the only viable solution is to create a Flutter Plugin.
So I mentioned a MessageChannel, but what is this?
What are these MessageChannel?
A MessageChannel is a mechanism to communicate from Dart code the native counterpart. You can think about this like exchanging messages with someone over a Messenger. You write something the other sends you a message back.
Sometimes you add an image as payload and get it gray scaled back. This can be seen as sending a message from flutter, getting it processed on the native site and getting back the result.
Message Channels in complex^^
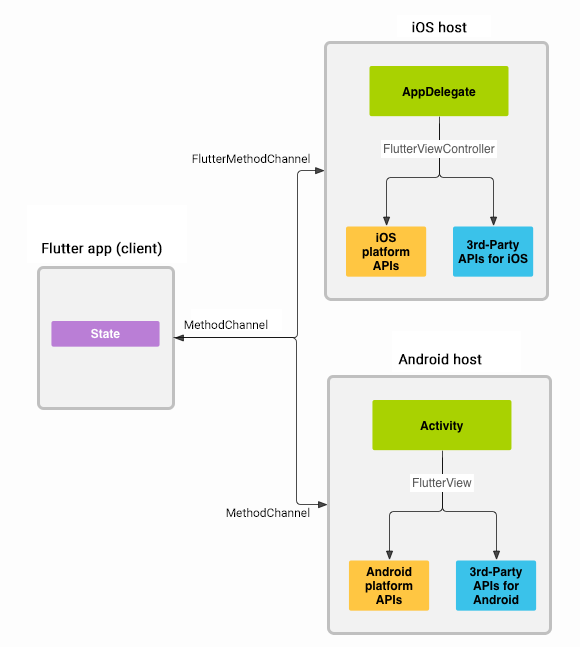
Architectural overview of platform channels
As you see above, we have to parts in this architecture: IOS and Android. Each has its own Platform APIs and 3rd-Party APIs (ahem, OpenCV :D) which we want to access.
To communicate with this APIs we need this so called MessageChannel to talk to the code on the other side.
When you run a Flutter Application it knows that it either has to use Android or IOs and uses that to access the correct MessageChannel and then return the wanted result.
Read the docs, they are awesome.
The Flutter docs are written really well. It has almost everything in there. I know it can sometimes be hard to find the right parts of the documentation, but really read them. Especially the parts about platform channels.
Case Study – Initial thoughts and decisions
So we have gathered a few characteristics until now. We know we want a Plugin and that we want to use OpenCV for most of the image processing and computer vision parts.
But we need a few more decisions to really start this up.
- Which languages do we want to use?
- As you maybe have read, we can use Swift or Objective C and Java or Kotlin for IOS and Android
- I decided to use Objective C for IOS because it is much easier to include C++ in Objective C than it is in Swift
- I decided to use Java because I’ve learned it in school and I never used Kotlin before
- What detections to we want to have?
- I want to detect rectangular shapes with 4 edges, I don’t need circles or triangles right now.
- I want to use relative coordinates rather than absolute coordinates
- I want to make a few helper functions to calculate absolute coordinates from the given relative ones
Relative Coordinates vs. Absolute Coordinates
So what the f**k is this again? Yeah I know, this happened all the time while implementing this plugin ^^.
We now that we have pixels in an image right? Yeah and you can access pixel like this: Get pixel at x: 505 and y: 400.
If we want to point to a point in an image we can also use this convention because it’s also a coordinate system ^^ (you see, x, y in a Cartesian coordinate system haha, I loove it ^^ )
This works really great, until you scale the image and everything is wrong and everything is bad and you are bad and you start crying becau… OK maybe this is a bit to much^^
BUT to circumvent this we can use so called relative coordinates.
Relative Coordinates are absolute coordinates divided by height or width (depending on which axis we want to move). This makes them independent of the dimensions of a image and make them portable through all kinds of scaling you might have to do.
Quick pause in the middle.
So we have made approximately 40% progress through the whole thing. I don’t want to make this a complete coding walk through, that would be redundant, because you can access the whole code in the projects repo.
But what I want is to point out where my hurdles were, where I had problems and why I did it this way.
Implement this thing
With so much background and information like we gathered in this post, we should finally be able to start implementing our plugin :D
Image processing basics
Hah ^^ I’ve got you. You thought we code now. Haha ^^ We start to code in a moment, but before we need a little bit more theory.
It is a normal thing to prepare an image before we start actually working with it.
In this plugin we have three steps, before we attempt to find the contour of our rectangle:
- greyScale
- Make it a bit more memory efficient and also faster to work with (also we don’t loose any details with this step in our case)
- blur the image (Gaussian blur)
- We blur the image just a little bit, with this step we can reduce the noise of small lines, which would otherwise interfere with the wanted result.
- adaptive threshold
- We want to remove pixels which are not in the
threshold. A normal threshold would strip everything away between a min and max value. This is not good when we have a different lightning conditions in an image. - Adaptive threshold adapts the threshold automatically for different areas of the image.
- We want to remove pixels which are not in the
After this three steps we have an image which is easy to use for a contour finding algorithm.
Creating a Plugin
I think you all can do this. It is really simple either use Android Studio or the flutter CLI and create a Plugin using Objective C and Java.
This is really easy to do. If you need a more detailed step-by-step guide look into the docs.
Tackling the Dart part
On the Dart side of our Plugin we want to create an easy to use interface which we can use in our projects to access the plugins functionality.
As we said above we want only to detect rectangles for now. So we need to invoke that method on the MethodChannel and send it the necessary data.
class ImageFeatureDetector {
static const MethodChannel \_channel =
const MethodChannel('image_feature_detector');

    static Future<String> get getVersionString async {
        final String version = await \_channel.invokeMethod('getVersionString');

        return version;
    }

    static Future<Contour> detectRectangles(String filePath) async {
        String data = await \_channel.invokeMethod<String>("detectRectangles", {"filePath: filePath});

        return Contour.fromJson(json.decode(data));
    }

}
Soo, what is going on here?… We don’t have it documented.. Yeah I know ^^
All this does is to wrap a invokeMethod call and return that data (either without further processing or mapping it’s value to a object)
We send a file path because I didn’t want to create a custom codes for my PlatformChannel.
Also I hope this makes it a little bit more memory efficient than throwing around a byte[] or something else. Also we have different kinds of images objects on each platform which are not compatible with each other, so this is another pro for this approach.
Tackling the Java Part
So I struggled a bit with this one, because I haven’t worked with Gradle and all this Java things before (back in my time we used Maven.. and we didn’t liked it.. xD).
Add dependencies
First thing first, we need to add OpenCV to our Java project. After searching for a second I have found that there are already wrappers around the C++ Code for Java, which is very good (because less work for us)
The project is called javacpp-presets, so lets add this into our Gradle file.
There are a few Gradle files we look for the image_feature_detector/android/build.gradle file and add following lines to the dependencies field of the Gradle file:
// If the dependency node exists, add the implementation line in there, otherwise copy everything.
dependencies {
implementation 'org.bytedeco.javacpp-presets:opencv:4.0.1-1.4.4'
implementation 'org.bytedeco.javacpp-presets:opencv:4.0.1-1.4.4:android-arm'
implementation 'org.bytedeco.javacpp-presets:opencv:4.0.1-1.4.4:android-arm64'
implementation 'org.bytedeco.javacpp-presets:opencv:4.0.1-1.4.4:android-x86'
implementation 'org.bytedeco.javacpp-presets:opencv:4.0.1-1.4.4:android-x86_64'
}Add method calls to Java
First find the plugin folder in the android folder: I mean yeah, here you go, it’s long and i needed some time to find it (change names for your own plugin.
image_feature_detector/android/src/main/java/com/matas/image_feature_detector/
There are a few files in my repo, what do they do?
- ImageFeatureDetectorPlugin.java
- This is the
Pluginfile that takes method calls from theMethodChannel - This file maps each method call something else you want to do.
- This is the
- ImageDetector.java
- This is the main entry point, which I use to process the things.
- I like to have my code separated, so this is a convenient way to do it.
- This class has a
detectRectanglemethod which takes afilePathand returns a string of some data - We return a string here, because we cannot return object as result of a method channel
- It is actually a JSON representation of the found Contour that we can serialize in Dart
- ImageTransformer.java
- Encapsulateds the whole logic around modifying the image for processing.
We are lucky that we have the javacpp-presets, this makes it really easy to use OpenCV here.
The code of this repository can be found in the repository i mentioned above. Because of the scope of this project I didn’t want to make a step-through guide for making a plugin.
Tackling Objective C
So this is the last big step on our journey through creating a real word plugin for flutter.
What gave me headaches here is that I didn’t know that there are so called workspace files in IOS development (I mean come on, VS Code has folders b*tches).
To open the correct workspace, we have to open the Runner.xcworkspace in the example/ios folder. I mean come on, really??!?! example folder?…
OK, this is my rage about this…
To get the everything running, we have a few steps to do.
- Include OpenCV as a dependency into our PodSpec. PodSpec is like Gradle for Java.
 # Add following line to the image_feature_detector/ios/image_feature_detector.podspec

s.dependency 'OpenCV2'
After a pod install in the example directory (where the PODSPEC file is located) the OpenCV IOS Framework should be installed and ready to go
- Change the .pch (precompiled header file) to include the opencv code
#ifdef \_\_cplusplus
#import <opencv2/opencv.hpp>
#endif
This will tell XCode to add the OpenCV headers when we compile everything.
Caution: Somehow this *.pch file gets overwritten when installing podfiles or when changing a specific thing. You will get an error that opencv is not included. Add the above snippet again.
- Rename all
*.mfiles to*.mmin your working directory
*.m is the file extionsion for Objective C files. When using C++ we simply have to rename them to .mm which is the extionsion for Objective C++ (which in case is a superset of c++)
After trying this with swift and a few dead ends, I chose Objective C because the C++ interop is much easier here. In fact swift doesn’t has support for C++. You have to go over Objective C there too.
After this steps it’s just converting JAVA to Objective C in the end (which is not that hard after you accept all the :: and `and@` which are everywhere in Objective C.
Case Study - Finishing up
At this point we have a “finished” plugin. I put this into quotes because I wanted this to be something more meta than other blog posts.
You have read about which questions to ask at the beginning. Which things to consider and why I chose the things I did. This should help you much more than copied source code from the open sourced repository on github.
Surely Kotlin and Swift are lovely languages on their own, but I don’t think that you should choose such an important part of a project simply based on such metrics.
There might be other use cases where Swift would shine much more than it does here, but that doesn’t mean that I have to use it everywhere.
Also the flutter docs are amazingly good, they have everything you need, but sometimes you are overwhelmed by the vast majority of choices you have to make and technologies to use.
This is and was at least my experience while creating this plugin. Mostly because I used the majority of technologies for the first time. Maybe this will get better in the future.
Summary
So after this enormous write up of the past week and half of my life, I hope I made a few things clearer for you.
If you got here, I guess you are at the same point as I was. In that case keep a few things in mind.
Languages are mostly the same, there are only small (or bigger, ahem pointers*) differences in the syntax.
My primary languages are Typescript, C# and Dart, so I had to really bite through this pointer stuff in Objective C++. Also keep in mind that there are Workspace files in XCode ^^
Also star this repository and use it. Also PRs and feedback are appreciated.
Thanks for reading in again.